Construction serves as the backbone of residential, industrial, and commercial development, with construction workers wielding tools under the guidance of project planners and architects.
While often deemed a craft, construction comprises numerous trades, each demanding distinct skills and tools.
This article delves into a comprehensive list of over 50 indispensable tools and equipment utilized by construction workers across various trades such as bricklaying, masonry, carpentry, demolition, electrical works, and beyond.
Claw Hammer | Brick Hammer | Screwdrivers | Pliers | Adjustable Wrench | Set of Fixed Wrenches | Trowel | Shovel | Spade | Hoe | Rake | Screed | Rammer | Sawhorse | Ladders | Wheel Barrow | Tile Cutter | Tape Measure | Diameter Measure Tape | Measuring Wheel | I-Beam Level | Laser Level | Stud Finder | Chalkline Reel | Survey Rope | Plumb Bob Level | Construction Calculator | Construction Hard Hat | Tool Belt | High Visibility Vest | Construction Gloves | Steel Toe Boots | Protective Eyewear | Hearing Protection | Face Protection Visor | Respirator | Concrete Mixer | Sand Screening Machine | Plate Compactor | Jackhammer | Angle Grinder | Circular Saw | Power Drill | Impact Driver | Nail Gun | Hammer Drill | Oscillating Tool | Concrete Sander | Welding Tool | Wall Chaser | Reciprocating Saw

Key Construction Steps for Context:
Foundation Pouring: Initiating construction by preparing a leveled surface, framing the foundation, and pouring and leveling concrete to establish a sturdy base for the structure.
Rough Framing: Following concrete curing, framing floors, walls, and ceilings using materials such as wood, bricks, or stone blocks, tailored to project requirements.
Rough Plumbing and Electrical Works: Installation of essential infrastructure including pipes, wires, supply lines, bathroom fixtures, and ventilation systems.
Insulation: Essential for climate control, utilizing materials like foam, panels, or concrete blocks to shield the structure from external elements and maintain indoor comfort.
Interior Finishing: Completion of interior elements such as drywall, doors, windows, flooring, and tiling, alongside finalizing electrical, plumbing, and ventilation components for a functional and aesthetically pleasing interior space.
1. Claw Hammer

The claw hammer, a ubiquitous tool in construction, is favored by workers for its versatility and practical design.
Its claw-shaped tail serves multiple purposes, including nail removal and demolition tasks, while the curved head provides added leverage for pulling against flat surfaces.
Particularly common in carpentry, construction contractors often opt for the framing claw hammer, featuring a checkered nose for enhanced grip during framing tasks and a heavier head, weighing up to 32 ounces.
A safety tip: Consider selecting hammers with fiberglass handles for increased durability and shock absorption, especially during prolonged use.
2. Brick Hammer

Meet the Brick Hammer, also known as the Stonemason’s hammer, a close relative of the claw hammer with its own distinct purpose.
Featuring a square-shaped flat nose and a tail resembling a flat pick or chisel, this tool excels at cutting bricks, cinder blocks, or shaping small stone pieces.
To use it effectively, start by marking the cutting line with a carpenter’s pencil. Then, with repeated strikes, the hammer’s tail creates a deep cut along the marked line, allowing for precise splitting of materials like bricks or concrete blocks.
After the initial cut, minor chipping with the hammer ensures a smooth finish, making it ideal for fitting pieces into corners, archways, or any other intricate spaces requiring custom shapes.
3. Screwdrivers

Screwdrivers are essential tools for various construction tasks, particularly in electrical and plumbing work where screws are commonly used for securing fixtures.
While power tools often dominate framing work, screwdrivers remain indispensable for certain tasks.
A basic set should include both Philips and flathead screwdrivers, though types like Torx and Robertson are gaining popularity with modern construction materials.
Investing in durable steel screwdrivers with resistant handles and long shanks provides added torque and longevity.
Magnetic tips can be a lifesaver in busy construction environments, preventing screws from being dropped, especially when working on ladders.
4. Pliers

Pliers, versatile hand tools essential for electrical work, offer a range of functions including wire cutting, bending, crimping, and object gripping.
Diagonal or side-cutter pliers are standard wire-cutting tools, featuring a jaw with two blades. Lineman’s pliers, similar but with a shorter bladed jaw, accommodate gripping and bending sheet metal alongside wire cutting.
Combination pliers, often considered the “jack of all trades,” enable gripping, squeezing, and cutting simultaneously. However, specialized sets excel in specific operations, making them essential for various construction tasks.
5. Adjustable Wrench

The adjustable wrench, also known as the adjustable spanner in English-speaking regions outside the United States, is a versatile tool commonly used by plumbers and mechanics. Its movable jaw, adjustable via a rotating bolt or cylinder, allows it to replace multiple fixed wrenches for most bolt sizes, offering convenience on construction sites.
However, it’s essential to note that adjustable wrenches have limitations, particularly in handling high torque stress.
In situations requiring significant force, such as loosening tightly cemented bolts, switching to a fixed wrench with a long handle is advisable to avoid wearing out the adjustable jaw or risking breakage.
While adjustable wrenches offer convenience, they are not suitable for heavy torque applications. Therefore, it’s prudent to also consider investing in a set of fixed wrenches for specialized tasks on construction sites.
6. Set of Fixed Wrenches

Let’s now explore the reliable counterparts to adjustable wrenches – fixed wrenches.
Crafted from chrome or stainless steel for durability and resistance to rust and abrasion, fixed wrenches are essential for applying high torques to nuts, bolts, and rotary fasteners.
Available in various types such as open wrenches, ring wrenches, ratchets, and Torx wrenches, they serve diverse construction needs.
For construction tasks, a set of open wrenches ranging in size is recommended. A basic kit of around 10 wrenches, spanning from a quarter-inch to one and a half inches, ensures versatility for projects ranging from residential to larger plumbing endeavors.
7. Trowel

The trowel stands as an iconic hand tool in construction, resembling a miniature shovel or, for masonry work, a flat-surfaced triangle affixed to a handle.
In construction, two primary types of trowels are prevalent: the masonry trowel, for applying bonding material in bricklaying, and the flat trowel, for smoothing surfaces of cement or fresh concrete.
Though seemingly straightforward, mastering the use of trowels requires significant skill and practice, often regarded more as an art form than a craft due to their complexity.
When purchasing a trowel, investing in a rust-resistant, easy-to-clean model with a comfortable, sturdy handle is advisable. This ensures longevity and facilitates the learning process over the years of practice ahead.
8. Shovel

Shovels are indispensable on construction sites, crucial for establishing sturdy foundations for future buildings.
They serve multiple purposes, from digging piping trenches to transferring materials between surfaces and containers, and preparing foundations.
In challenging terrain filled with rocks and stones, durable shovels with sheet metal blades and maple wood handles are essential for effective digging.
Investing in sturdy shovels ensures durability and reliability in demanding construction environments.
9. Spade

It’s crucial to differentiate between shovels and spades, often confused despite their similar appearances.
While spades resemble shovels in appearance and function, they excel at carrying loads, whereas shovels are designed for digging, thanks to their sharper blade angle.
Very useful for tasks such as excavation, trenching and landscaping.
10. Hoe

While not typically associated with construction, the hoe can prove indispensable in preparing foundations, particularly on varied terrain.
Prior to pouring a foundation, the ground must be excavated and leveled, tasks in which the hoe excels.
With its sharp, pointed blade, the hoe offers greater penetration than shovels, ideal for breaking apart solid, tightly packed soil. Once loosened, excess topsoil can be easily removed and the ground leveled, facilitating construction.
11. Rake

Rakes, commonly associated with gardening, also find extensive use in preparing construction sites.
Primarily utilized for leveling highly granular areas like gravel fields, rakes efficiently rearrange small stones into place with a simple back-and-forth motion.
Once leveled, the gravel is ready for the next step of compaction, typically achieved using tools such as compactors or rammers.
12. Screed

Screeds are essential for achieving a smooth, level concrete surface by evenly leveling and removing excess material.
Typically used on freshly poured, wet concrete, wider screeds are favored by contractors for better efficiency.
While various types of screeds operate similarly, they differ in handle type and blade size. Blades range from 3 to 15 feet or more, requiring steady handling, especially with larger sizes.
Premium screeds may feature dual handles for improved balance, while smaller ones may have a rotating handle for adjusting the blade angle, akin to a mop.
13. Rammer (hand rammer tool)

The rammer, a basic hand tool, is vital for compacting layers of soil and materials.
Featuring a wooden handle to absorb vibrations, it boasts a flat, reinforced metal head shaped like a square.
This tool serves as the manual counterpart to the compactor power tool, discussed later.
Repeatedly striking the square head against the surface compresses soil particles like gravel, eliminating air gaps and forming a solid foundation for further construction.
Compacting the earth before pouring foundations enhances the project’s durability, as compacted earth is more resistant to water, slipping, and seismic activity, reducing the risk of structural damage caused by settling or shifting ground.
14. Sawhorse

The sawhorse, more than just a tool, serves as a versatile workstation, comprising a simple bench with four horse-like legs.
Highly portable and easily deployable, especially with foldable stands, sawhorses are ubiquitous on construction sites, catering to both industrial-level projects and small DIY endeavors.
Essential for precise cutting and working with materials, their stable design provides a flat surface for tasks involving timber, plywood, or sheet metal.
Beyond facilitating cuts, sawhorses function as stationary assistants in various construction tasks, doubling as benches, tables, stands, and even stools for accessing elevated areas.
15. Ladders

Construction workers rely heavily on ladders for accessing heights, making choosing the right one crucial.
A ladder serves as a lifeline for projects spanning multiple floors, emphasizing the importance of stability.
Prioritize stability when selecting a ladder, seeking features like padded stands, supportive legs, and sturdy fiberglass construction for durability.
Main types include step ladders, platform ladders, and extension ladders, each offering different height capabilities. A set comprising all three caters to most construction needs, particularly for residential and smaller building projects.
Related articles:
16. Wheel Barrow

Construction involves significant movement and logistical challenges, often requiring materials to be transported over long distances across challenging terrain.
The wheelbarrow presents a solution with several features to facilitate efficient and swift transportation.
Despite its compact appearance, the wheelbarrow boasts a deceptively large carrying capacity, limited only by the operator’s strength to push the cart.
Available in two common configurations – one wheel at the front or two wheels at the side – each type offers distinct advantages.
Single-wheel barrows are ideal for maneuvering across curved, flat surfaces, while two-wheeled versions provide greater stability on rough terrain, albeit with slightly more challenging steering.
17. Tile Cutter

Tile cutting is an essential task in construction, ensuring precise fitting for areas like door frames, window shafts, and irregular walls in bathrooms and kitchens.
The tile cutter, with its straightforward design, simplifies this process, offering ease of operation.
To cut a tile, it’s placed in the cutter and positioned to align with the lever. Lowering the lever applies mechanical force, breaking the tile along the desired line to achieve a straight cut.
This process can be repeated to create smaller tile pieces, such as quarters, for intricate fittings.
18. The Tape Measure

A tape measure is a flexible measuring tool used to determine the length, width, or height of objects or spaces. It typically consists of a ribbon of metal, fiberglass, or cloth marked with linear measurements, such as inches or centimeters, along its length.
Tape measures come in various lengths, from a few feet to several meters, and they often feature a retractable mechanism that allows the tape to be easily pulled out and then retracted back into its housing for storage.
They are commonly used in construction, carpentry, sewing, and other activities that require accurate measurements.
If you want to know how to read a measure tape check this article.
19. Diameter Measure Tape

Similar to the traditional tape measure, this tool specializes in measuring round objects and calculating their diameter, making it indispensable for construction workers.
Unlike standard tape measures, this one features a flat, flexible design, allowing it to lay seamlessly on round surfaces.
After measuring the circumference, a simple division with Pi yields the diameter, with most diameter tapes conveniently marked with length measurements divided by Pi.
Though not as commonly used as calipers for measuring short-diameter objects, it’s invaluable for tasks like installing silos in rural settings.
Also known as Pi Tape, Inside Diameter Tape, or Periphery Measuring Tape.
20. Measuring Wheel

The measuring wheel is a straightforward tool designed for straight measurements on flat surfaces, making it ideal for construction tasks.
Ensure the surface is flat and as smooth as possible before use to minimize inaccuracies.
Operating the tool involves counting the wheel’s revolutions as you push it, with the digital counter on the handle displaying the final measurement.
Maintain a steady pace to reduce errors, bearing in mind that the measuring wheel provides estimates rather than precise measurements, with potential inaccuracies of around 2%.
It’s most useful for planning the installation of long, flat surfaces in construction projects, including parking areas, driveways, garage approaches, backyard sections, and more.
21. I-Beam Level

The traditional level, also referred to as the I-beam or straight beam level, is a fundamental tool in construction for ensuring precise leveling.
Essential for checking horizontal surfaces at 0 degrees and vertical surfaces at 90 degrees, it’s a staple on any construction site.
Many beam levels also feature a third indicator for assessing 45-degree surfaces, commonly found in roofing or stair installations.
22. Laser Level

Laser levels represent a modern upgrade from traditional leveling tools, utilizing laser technology to project beams in both horizontal and vertical directions.
Typically mounted on tripods, these devices require alignment with existing surfaces to ensure accuracy.
Rotating laser levels, which scan large areas, are also available. As long as the beams create straight lines on all surfaces, the setup is deemed correct.
From framing foundations to setting up initial project parameters, laser levels are crucial in construction, demanding proper operation for project success.
23. Stud Finder

Stud finders are indispensable tools for locating metal elements concealed behind walls, aiding in safe and efficient construction or renovation projects.
When working on installations or remodeling, knowing the positions of electrical wiring, piping, vents, and structural beams is crucial.
These devices employ various technologies for detection. Basic models, such as magnetic finders, use magnets to detect metal objects up to ¾ inch (19 millimeters) deep.
Advanced stud finders utilize radar, metal detection, density sensors, and imaging methods for more accurate detection. Some high-end models can pinpoint the precise location and density of materials and feature notches for marking areas with a carpenter’s pencil or marker.
24. Chalkline Reel

A chalk line reel, also known simply as a chalk line, is a construction tool used to create straight and level lines over surfaces, such as walls, floors, or ceilings. It consists of a retractable reel that holds a length of string or cord coated with chalk powder.
To use a chalk line reel, the cord is stretched tightly between two points on the surface where the line is needed.
Once in position, the cord is snapped or “plucked” against the surface, leaving a visible line of chalk behind.
This line serves as a guide for various construction tasks, such as framing, laying tiles, or installing drywall.
Chalk line reels come in various sizes and designs, ranging from handheld models to larger, more heavy-duty versions for professional construction work. They are essential tools for ensuring accuracy and precision in construction projects.
25. Survey Rope

Survey ropes are foundational tools in construction, vital for achieving accurate measurements on varied terrain.
These specialized braided ropes are affixed to sticks or bars inserted into the ground, facilitating straight measurements even on uneven surfaces.
In bricklaying, they assist masons in maintaining perfectly even walls.
Marked with distances, they serve as alternatives to measuring wheels on rough or uneven terrain.
Proper tension is essential during setup to prevent slumping.
26. Plumb Bob Level
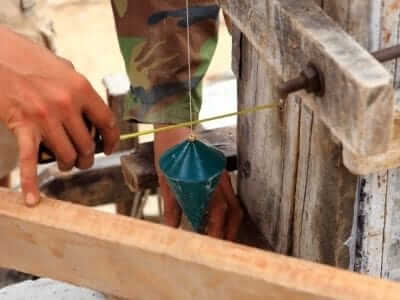
A plumb bob level, commonly known as a plumb bob, is a tool used in construction and carpentry to establish a perfectly vertical reference line or to determine the true vertical alignment of a surface. It consists of a weight, typically made of metal or brass, attached to the end of a string or cord.
To use a plumb bob, the weight is suspended from a fixed point above the surface being measured, allowing the weight to hang freely. The string aligns itself with the force of gravity, indicating a true vertical line.
Carpenters and builders often use plumb bobs to ensure that walls, posts, or structures are perfectly vertical.
Plumb bobs are also used in surveying and plumbing to establish vertical reference points and to ensure accurate measurements and installations.
They are simple yet effective tools for achieving precision in construction and alignment tasks.
27. Construction Calculator

A construction calculator, also known as a construction-specific calculator, is a specialized device tailored to the needs of construction professionals. It helps in performing various calculations relevant to construction projects, such as estimating material quantities, calculating dimensions, determining costs, and converting units.
These calculators typically come equipped with specialized functions and features designed specifically for construction tasks. They may include functions for calculating area, volume, and linear measurements, as well as functions for working with fractions, decimals, and various units of measurement commonly used in construction.
Construction calculators often have durable and rugged designs to withstand the harsh conditions of construction sites, with features like large buttons for easy use while wearing gloves and dust and moisture resistance.
Overall, construction calculators play a crucial role in ensuring accurate and efficient calculations in construction projects, helping professionals save time and minimize errors in their work.
28. Construction Hard Hat

The hardhat is an iconic symbol of safety on construction sites, mandated for all workers to wear for protection against potential hazards.
Constructed from durable materials like hardened plastic, modern hardhats offer robust defense against falling objects, reducing the risk of serious injuries.
These hats are essential for safeguarding workers from potentially life-threatening accidents, such as deep cuts caused by falling debris.
29. Tool Belt

The toolbelt serves as a convenient storage solution for essential hand tools like hammers, pliers, screwdrivers, and measuring tape, ensuring quick access on construction sites.
Compared to carrying a toolbox, the toolbelt minimizes strain by evenly distributing weight around the waistline, enhancing mobility and efficiency.
For added functionality, consider upgrading to a construction vest equipped with specialized pockets for various tools, measuring equipment, digital devices, and other essentials, offering both comfort and practicality.
30. High Visibility Vest

High-visibility vests are standard attire in construction zones near busy roads, enhancing worker visibility for passing drivers and promoting safety by encouraging them to slow down.
While commonly worn by traffic workers, wearing these vests is advisable for anyone working near highways or bustling streets to prioritize safety.
Incorporating high-visibility vests not only boosts safety but also adds a professional touch to construction projects, emphasizing a commitment to safety protocols.
31. Construction Gloves

Durable, comfortable gloves are essential for construction safety, protecting against common injuries like scratches, cuts, and chemical exposure from building materials.
Opt for gloves with rubber padding for enhanced grip and ensure a snug fit to prevent slipping or snagging on sharp edges or machinery.
When choosing gloves, consider trying them on and consulting size charts to ensure they provide adequate protection without hindering movement.
These gloves are indispensable for various construction tasks, shielding hands from hazards during tasks such as handling materials, operating machinery, and working with chemicals.
32. Steel Toe Boots

Steel toe boots, also known as safety toe boots or steel-capped boots, are protective footwear designed to provide safety and protection for the toes and feet in hazardous work environments, particularly in construction, industrial, and manufacturing settings.
These boots feature a reinforced protective cap made of steel or other composite materials at the toe area, typically covering the toes up to the metatarsal bones. The steel toe cap is integrated into the boot’s design to protect against impact from heavy objects, falling debris, compression, and crushing injuries. It serves as a barrier between the wearer’s toes and any potential hazards present in the workplace.
Steel toe boots are often required or recommended in workplaces where there is a risk of foot injuries due to falling objects, heavy machinery, sharp objects, or electrical hazards. They provide essential protection for workers and help prevent serious injuries such as broken bones, lacerations, and amputations.
In addition to the steel toe cap, these boots may also incorporate other safety features such as slip-resistant soles, puncture-resistant midsoles, electrical hazard protection, and insulation against extreme temperatures.
Overall, steel toe boots are an essential piece of personal protective equipment (PPE) for workers in high-risk industries, providing both comfort and protection to ensure workplace safety.
33. Protective Eyewear

Protective glasses or goggles are essential alongside a hard hat for construction safety.
They are typically made of impact-resistant polycarbonate and offer protection against small flying objects, wood chips, sparks, and debris.
While basic glasses lack side protection, goggles provide greater safety, albeit with potential discomfort for some users.
Anti-fog coatings are available to prevent lens fogging, ensuring clear vision in humid conditions.
Investing in high-quality eye protection is crucial for safeguarding against construction hazards and ensuring long-term eye health.
34. Hearing Protection

Construction sites are often loud environments due to power tools, machinery, and falling objects.
To protect your hearing from potential damage, investing in hearing protection is crucial.
The type of protection depends on your level of exposure to noise. For constant background noise, noise-canceling earbuds are ideal for comfortable, long-term wear.
For intense, short-term noise from tools like jackhammers and power drills, noise-canceling headphones offer higher levels of protection.
Their convenience allows for easy on-and-off wear while providing effective noise reduction.
35. Face Protection Visor

In construction, safeguarding your face, eyes, nose, and airways is crucial for overall health and safety.
Investing in high-quality protective gear is essential, but it should not impede your work.
Visors offer non-obtrusive face protection, shielding the forehead, cheeks, and chin while allowing for comfortable movement.
Made from durable materials like polycarbonate, they provide reliable protection without hindering your tasks.
36. Respirator

A respirator is a type of personal protective equipment (PPE) designed to protect the wearer from inhaling harmful airborne contaminants, such as dust, particles, gases, vapors, and infectious agents. It forms a barrier between the wearer’s respiratory system and the surrounding environment, filtering out or removing harmful substances to prevent inhalation-related health risks.
Respirators come in various forms, including disposable masks, reusable half-face or full-face masks, and powered air-purifying respirators (PAPRs). They typically consist of a filtering material, such as particulate filters, chemical cartridges, or combination filters, which remove specific types of contaminants from the air.
Respirators must be properly fitted to ensure a tight seal around the wearer’s face, minimizing leakage of contaminated air into the respiratory system. They should also be selected based on the specific hazards present in the workplace and the level of protection required for the task at hand.
Overall, respirators play a crucial role in protecting workers from respiratory hazards in various industries, helping to safeguard their health and well-being in potentially hazardous environments.
37. Concrete Mixer

A concrete mixer is a construction tool used to combine cement, aggregates (such as sand or gravel), and water to create concrete, which is a vital building material used in various construction projects. The mixer typically consists of a rotating drum or barrel mounted on a frame, with blades or paddles inside to mix the ingredients thoroughly.
There are several types of concrete mixers, including:
1. Transit mixers: These are large trucks equipped with rotating drums that transport freshly mixed concrete to construction sites. The drum continuously rotates during transit to prevent the concrete from setting and to ensure uniformity.
2. Batch mixers: These stationary or portable mixers are used to mix concrete in batches at the construction site. They come in various sizes and configurations, from small electric-powered mixers for DIY projects to large diesel-powered mixers for commercial use.
3. Pan mixers: These mixers have a stationary pan or trough with rotating blades that mix the concrete ingredients. They are commonly used for small-scale concrete production or for mixing specialty concrete products.
4. Tilting drum mixers: These mixers have a tilting drum that can be rotated to pour the mixed concrete. They are often used for small to medium-sized construction projects and are available in both electric and gasoline-powered versions.
Concrete mixers are essential for ensuring the proper consistency and quality of concrete, as well as for optimizing efficiency and productivity on construction sites. They play a critical role in various applications, including building foundations, roads, bridges, sidewalks, and other structures.
38. Sand Screening Machine

A sand screening machine, also known as a sand screener or sand sieve, is a mechanical device used to separate sand particles of different sizes from one another. It typically consists of a vibrating screen or mesh deck with different-sized openings or perforations.
Sand screening machines are commonly used in construction, mining, quarrying, and aggregate production to efficiently separate and classify sand particles for various applications.
They are essential equipment in industries where accurate particle size distribution and quality control are crucial, such as in concrete production, asphalt mixing, and soil stabilization.
39. Plate Compactor
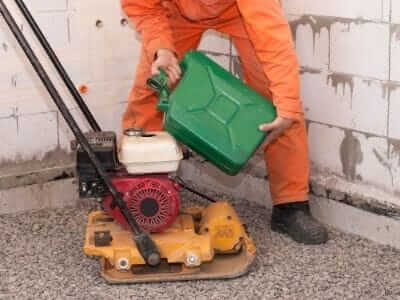
The plate compactor, a powered version of the rammer hand tool, offers greater convenience and effectiveness in soil compaction.
Its heavy bottom plate moves back and forth forcefully, compacting soil particles efficiently.
Ideal for larger projects on rough terrain, plate compactors feature handles for easy maneuverability.
Multiple passes over each area ensure thorough compaction, preventing soil deformation in adjacent areas.
40. Jackhammer

A jackhammer is a powerful tool designed to break apart concrete and asphalt with repeated blows, producing significant noise and vibrations.
Powered by pneumatic or electrical force, the engine drives a chisel-shaped blade back and forth.
With engines typically boasting around 1600 watts, jackhammers efficiently demolish stone, rock, asphalt, or concrete surfaces into manageable pieces.
However, prolonged use can pose risks due to the vibrational force on the operator’s body, necessitating comfortable gloves and hearing protection for safety.
41. Angle Grinder

Angle grinders, also referred to as disc or side grinders, are versatile power tools utilized for grinding, cutting, and polishing surfaces.
Typically driven by electric motors, they impart rotational force to the grinder disc, which can be interchanged with other types of discs for specific tasks such as sharp cuts or abrasive sanding.
Primarily employed in cutting wood or metal, angle grinders vary in power depending on their size, with discs ranging from 4 to 12 inches in diameter.
Their adaptability is a key advantage; by simply swapping out discs, users can transform the tool’s function for cutting, sanding, polishing, and more, making them indispensable across various construction tasks.
42. Circular Saw

Circular saws are handheld power tools designed for straight cutting across various materials such as wood, metal, and masonry.
Easily identifiable by their large, vertically positioned circular blade encased in metal framing, circular saws are indispensable tools on construction sites.
Blades are specialized for specific materials, necessitating appropriate selection for optimal performance across different cutting tasks.
To ensure safety and precision, it’s advised to secure materials firmly with vises or clamps while operating the circular saw.
43. Power Drill

Power drills are versatile handheld tools utilized for drilling holes and driving screws in construction projects.
Available in both corded and cordless variants, corded drills offer continuous power, while cordless ones provide portability and flexibility on-site.
Standard features include speed and torque adjustments, enabling users to control drilling power and speed according to the task at hand.
The reverse function facilitates easy screw removal by changing the rotation direction.
Accompanied by sets of drill bits of varying diameters, power drills are essential for tasks ranging from drilling through wood to fastening bolts securely.
44. Impact Driver

Impact drivers, similar to drill drivers, excel at driving screws efficiently in construction projects.
While power drills with screw-driving bits suffice for DIY tasks, impact drivers offer distinct advantages, boasting two to three times the torque of conventional tools.
Their unique combination of rotational and concussive force enables rapid screw insertion into various materials, including tough timber, metal, and masonry.
Though lacking the versatility of standard drill drivers, impact drivers compensate with exceptional efficiency, making them ideal for prolonged screw-driving tasks.
For optimal performance when working with dense materials, upgrading to a higher-capacity battery is recommended to ensure adequate torque for swift screw insertion.
45. Nail Gun

A nail gun is an essential tool in construction, particularly for framing and assembling wooden structures. While driving large nails with hammers is suitable for specific tasks, nailers excel in handling smaller nails with remarkable speed and efficiency.
These tools are typically powered by compressed air, electricity via cords, or rechargeable batteries. They utilize rapid, high-pressure mechanisms to swiftly embed nails into wood, offering precise control over insertion angles, including 45 or 60 degrees.
Nail guns are ideal for tasks requiring the rapid insertion of small nails, such as framing drywall or plywood. They streamline projects that involve numerous nails spaced evenly throughout the workpiece.
46. Hammer Drill

The hammer drill is a specialized tool designed for drilling into tough materials like masonry and concrete, commonly encountered in construction projects. It’s essential for creating holes needed for screws, anchor bolts, and framing attachments in walls and ceilings.
Unlike standard drills, the hammer drill’s key advantage lies in its versatility and drilling speed. It combines rotary motion with percussive action to penetrate hard materials such as bricks, cement, or concrete blocks efficiently. This percussive motion, operating at high speeds, chips away at the material with each drill bit insertion.
Most models feature a switch to disable the hammer action, converting the tool into a conventional drill. While hammer drills are more expensive than standard drills and used selectively, their ability to handle various materials makes them invaluable for saving time and effort on construction sites.
47. Oscillating Tool

The oscillating tool is a versatile and powerful device used for cutting various materials like wood and metal. Unlike conventional saws, its standout feature lies in its adaptability and versatility.
Equipped with a range of attachments, the oscillating tool can handle numerous types of cuts and tasks, including sanding with sandpaper attachments. It excels at freehand cutting, making it effortless to create curved and irregular cuts.
Operating by rapidly moving the blade back and forth, the oscillating tool provides precision and control. However, it struggles with cutting objects that aren’t securely held in place, as their movement can disrupt the cutting process. Therefore, using vises and clamps to stabilize the material is essential for optimal performance.
48. Concrete Sander

Concrete surfaces often require additional finishing to achieve a smooth texture. Despite efforts in leveling and using screeds, sanding is often necessary before polishing can commence.
Concrete sanders function similarly to regular sanders but are equipped with robust and durable sanding surfaces tailored for concrete.
There are two main types: floor sanders, which are pushed and dragged across large surfaces, and edge sanders, handheld tools used for intricate work such as corners.
Instead of traditional sandpaper, these sanders utilize diamond grinders. These grinders feature industrial-grade diamonds on their rims, allowing them to effectively shave concrete surfaces to the desired smoothness.
Once the concrete surface is sufficiently smoothed, protective epoxies are commonly applied to enhance durability and provide a finishing touch.
49. Welding Tool

The welding tool is indispensable for metal-related work in construction.
Welding joins metal pieces into a cohesive structure using either flame or electricity.
The primary types of welding are arc welding and torch welding.
Arc welding employs an electrically powered tool to fuse metal pieces together, often using a filler material like a welding rod.
Torch welding, on the other hand, utilizes gas-fueled flames to heat and connect metal at high temperatures.
While torch welding yields superior welds, it requires a complex set of tools and is declining in industrial use, though still prevalent in small repair and DIY projects.
50. Wall Chaser

Wall chasers, resembling smaller circular saws, are essential for cutting plywood or drywall to accommodate electrical, piping, and HVAC installations.
Equipped with small-diameter abrasive discs, they ensure precise and shallow cuts in the material.
Their lightweight and portable design make them easy to carry and maneuver, allowing for straight cuts with minimal effort.
Wall chasers’ reduced power consumption enables safe connection to the same power supply as larger tools without risking overload.
51. Reciprocating Saw

The reciprocating saw, often encompassing tools like saber saws and jigsaws, is a versatile instrument extensively used in construction, particularly for demolition tasks necessitating swift curved cuts at challenging angles.
Characterized by its long, thin blade moving back and forth to generate cutting force, this saw excels in maneuverability for irregular cutting tasks.
Adding a reciprocating saw to your toolkit significantly expands capabilities, enabling intricate cuts inaccessible to other tools due to their blade shape limitations.
If you found this article helpful, please explore the following: